
Getting Started
Things You Need
Some things you will definitely need:
PYNQ board
USB to Micro-USB cable
MicroSD card at least 8GB in size
MicroSD card reader for your computer (if the SD card has not been pre-configured)
Ethernet cable
A sense of curiosity and adventure
Note
Everything you need is included in the PYNQ accessory kit available for purchase with the PYNQ board.
Warning
The documentation assumes you have a microSD card configured from Applied Brain Research. If you are setting up your own board please see the Creating the SD Card section.
Installation Quick Reference Guides
Setting up the board can involve multiple steps depending on your computer and network configurations, so here are some quick reference guides. Use the middle-mouse-button click or press CTRL+left-mouse-button click to bring up each link in a new browser window.
Getting the Board NengoFPGA Ready
This guide details how to set up the board and your computer to be ready for use with NengoFPGA using a direct Ethernet connection between your computer and the board. If you only have one Ethernet port on your computer, it is recommended to use a USB-to-Ethernet adapter, or to follow this guide.
Setting up the board using this guide does not allow you to:
Have internet connectivity on the board.
Installation steps:
(Optional) If you don’t have one already, create the microSD card with the NengoBrainBoard image.
Connect the board to your computer with a direct Ethernet connection.
Configure the SSH between the board and your computer. Note that you will need to assign your computer a static IP address.
(Optional) If you haven’t already, use NengoFPGA to obtain your Device ID.
Copy the NengoFPGA bitstreams to the appropriate location.
Your system should now be NengoFPGA ready.
Getting the Board NengoFPGA and Internet Ready
This guide details how to set up the board and your computer to be ready for use with NengoFPGA, as well as providing internet accessibility to the board. It is recommended to use this guide if you wish to connect multiple boards to the same network your computer is on. It should be noted that getting internet access on the board is not necessary for NengoFPGA functionality. Rather, having internet access on the board is a convenience for your own development processes.
Installation steps:
(Optional) If you don’t have one already, create the microSD card with the NengoBrainBoard image.
Connect the board to your Ethernet network setup.
Configure the board to connect to the internet
Configure the SSH between the board and your computer.
(Optional) If you haven’t already, use NengoFPGA to obtain your Device ID.
Copy the NengoFPGA bitstreams to the appropriate location.
Your system should now be NengoFPGA ready, and should be connected to the internet.
Caution
If you have more than one board connected to your network (this is only possible using a network switch or router), make sure that each board has a unique IP on the network.
Only Getting the Device ID
This guide details how to set up the board and you computer to obtain the board’s Device ID only. Use this guide only if you are short on time and do not yet need to have the full NengoFPGA functionality available on your system. If you wish to have full NengoFPGA functionality available, it is recommended you follow the other guides in this section.
Setting up the board using this guide does not allow you to:
Use NengoFPGA with board.
Connect the board via SSH.
Have internet connectivity on the board.
Installation steps:
(Optional) If you don’t have one already, create the microSD card with the NengoBrainBoard image.
Connect your computer to the board via UART
Go to
/opt/nengo-pynq/and run the command:sudo python ./nengo_pynq/id_script.py
Other Board Configurations
If your system setup does not match any of the guides detailed above, please contact us for instructions tailored to your system.
Setup the PYNQ Board
The initial board setup steps below are taken directly from the PYNQ documentation, we decided to copy them here as we have some small changes in our workflow.
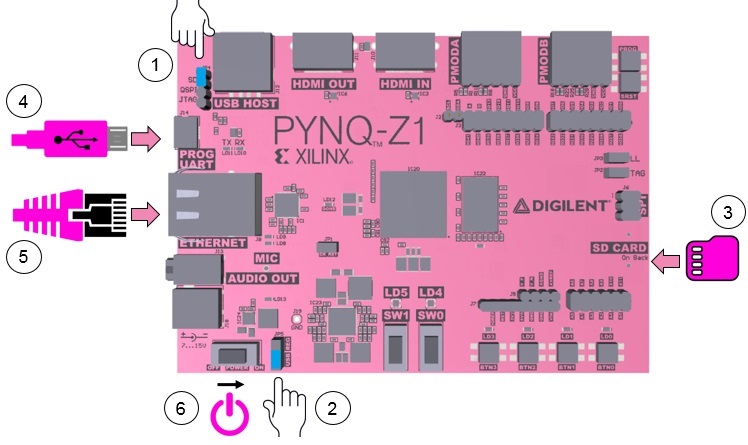
Image taken from official PYNQ documentation
Set the JP4 / Boot jumper to the SD position by placing the jumper over the top two pins of JP4 as shown in the image. (This sets the board to boot from the microSD card)
To power the PYNQ-Z1 from the Micro-USB cable, set the JP5 / Power jumper to the USB position. (You can also power the board from an external 12V power regulator by setting the jumper to REG.)
Insert the microSD card loaded with the NengoBrainBoard image into the SD CARD slot underneath the board.
Connect the USB cable to your computer, and to the PROG - UART / J14 Micro-USB port on the board.
Turn on the PYNQ-Z1 and check the boot sequence by following the instructions below.
Once the board boots correctly see the Connecting PYNQ section for connecting the board to your computer and to the internet.
PYNQ Boot Sequence
Slide the power switch to the ON position to turn on the board. The red LD13 LED will come on immediately to confirm that the board has power. After a few seconds, the yellow/green LD12 / Done LED will light up to show that the Zynq® device is operational.
After a minute you should see two blue LD4 & LD5 LEDs and four yellow/green LD0-LD3 LEDs flash simultaneously. The blue LD4-LD5 LEDs will then turn on and off while the yellow/green LD0-LD3 LEDs remain on. The system is now booted and ready for use.